
Prerequisites
This curriculum only supports using a laptop, desktop or supported Chromebook. We cannot help you set up a developer environment on a RaspberryPi or any other device.
Getting started
If you are already using MacOS, Ubuntu, or an official flavor of Ubuntu, you can skip this section. Otherwise, click on the small arrow to the left of the method you would like to use below to expand that section, and then follow the installation instructions.
Please Note: We can only support the operating systems indicated above. Our instructions have been tested with MacOS, Ubuntu, and official flavors of Ubuntu. We do not recommend installing an OS that is only based on Ubuntu (like Mint, Pop!_OS, ElementaryOS, etc).
Setup
IMPORTANT
This curriculum only supports using a laptop, desktop or supported Chromebook. We cannot help you set up a developer environment on a RaspberryPi or any other device.
Installing a Virtual Machine (VM) is the easiest and most reliable way to get started creating an environment for web development. A VM is an entire computer emulation that runs inside your current Operating System (OS), like Windows. The main drawback of a VM is that it can be slow because you’re essentially running two computers at the same time. We’ll do a few things to improve its performance.
Step 1: Download VirtualBox and Xubuntu
Installing a VM is a simple process. This guide uses Oracle's VirtualBox program to create and run the VM. This program is open-source, free, and simple. What more can you ask for? Now, let's make sure we have everything downloaded and ready for installation.
IMPORTANT
Once you have completed these instructions, you are expected to work entirely in the VM. Maximize the window, add more virtual monitors if you have them, fire up the Internet Browser in the Whisker Menu ![]() on the top left of the desktop. You should not be using anything outside of the VM while working on the curriculum. If you feel like you have a good understanding after using the VM for a while, and or want to improve your experience, we recommend dual-booting Ubuntu, which there are instructions for below.
on the top left of the desktop. You should not be using anything outside of the VM while working on the curriculum. If you feel like you have a good understanding after using the VM for a while, and or want to improve your experience, we recommend dual-booting Ubuntu, which there are instructions for below.
Step 1.1: Download VirtualBox
Go here and download VirtualBox for Windows hosts.
Step 1.2: Download Xubuntu
There are thousands of distributions of Linux out there, but Ubuntu is undoubtedly one of the most popular and user friendly. When installing Linux on a VM, we recommend downloading Xubuntu 18.04. Xubuntu uses the same base software as Ubuntu but has a desktop environment that requires fewer computer resources and is therefore ideal for virtual machines.
Step 2: Install VirtualBox and set up Xubuntu
Step 2.1: Install VirtualBox
Installing VirtualBox is very straightforward. It doesn’t require much technical knowledge and is the same process as installing any other program on your Windows computer. Double clicking the downloaded VirtualBox file will start the installation process. During the installation, you’ll be presented with various options. Leave them in their default state unless you are certain about their behavior. As the software installs, the progress bar might appear to be stuck; just wait for it to finish.
Step 2.2: Prepare VirtualBox for Xubuntu
Now that you have VirtualBox installed, launch the program. Once open, you should see the start screen.

Click on the “New” button to create a virtual operating system. Give it a name of “Xubuntu”, leave the “Machine Folder” as is, set the “Type” to “Linux” and be sure “Version” is set to “Ubuntu (64-bit)”. Continue by pressing “Next”, and choose the following options in the next steps:

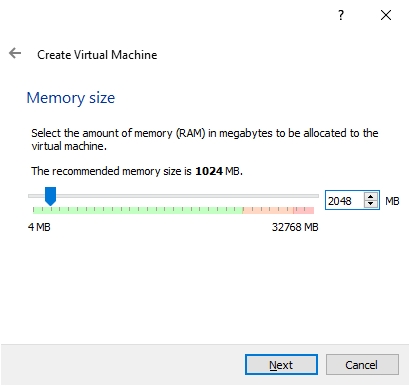
Memory size: Use 2048 MB or more if possible. Ideally, this amount should be about half of your computer’s maximum memory. For example, if you have 8 GB of RAM, allocate 4096 MB (1024 MB to 1 GB) to your VM’s operating system. If you do not know how much RAM is available to you, please click here.
Hard disk: Click “Create a virtual hard disk now”.
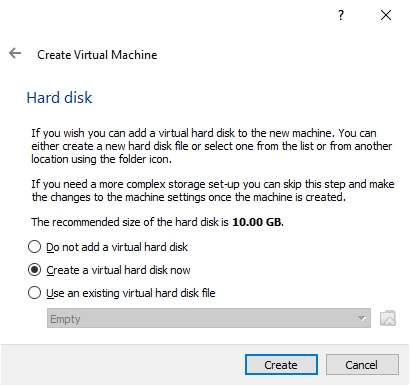
Hard disk file type: Choose the VDI (VirtualBox disk image) option.

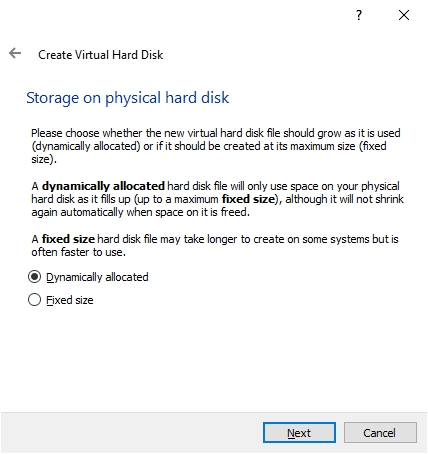
Storage on physical hard disk: “Dynamically allocated”.
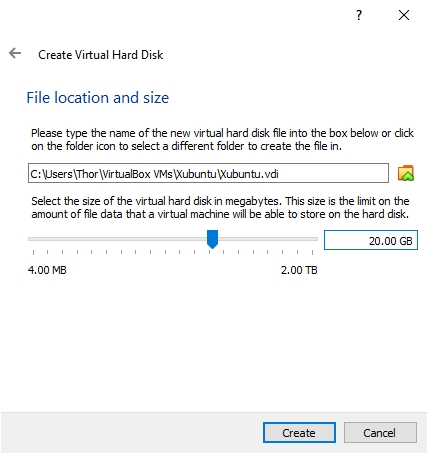
File location and size: We recommend at least 20 GB for the virtual hard disk.
After completing the last step, click the “Create” button. Your new virtual OS should now appear in the menu. With Xubuntu selected, click on the "Settings" button on the navigation bar, highlighted in red below.

Click on the “System” tab and then the “Processor” tab. Increase the Processor(s) to 2. If this screen prevents you from increasing processors, you likely need to enable virtualization in your computer’s BIOS/UEFI settings. If you have a single core processor, you will not be able to change this setting.

If you have more than one monitor, you can create additional monitors by increasing the "Monitor Count" attribute in the "Display" tab. Please be sure to increase the "Video Memory" slider until it is in the green. All other settings should remain default.

With all that complete, click "OK" to save the changes.
You cannot install Xubuntu without mounting the ISO you downloaded earlier. We will do that now. Click on the section labeled [Optical Drive] Empty to the right of the text labeled IDE Secondary Master under Storage at the main VirtualBox screen, while Xubuntu is selected. This will open up a dropdown menu, click Choose/Create a disk image....

The next window that opens, click on the Blue Circle with the Green Plus labeled Add, and locate your Xubuntu ISO file you downloaded earlier. Choose the ISO and click open.

You should now see the ISO on the Disk Selector screen. Click it and hit the Choose button at the bottom.

You can now start the VM by right clicking on the icon in the menu and by clicking the large "Start" arrow at the top.
When the VM starts up, you'll be asked to install Xubuntu. All of the default options can be left alone, including the Installation type ("Erase disk and install Ubuntu"). It may sound dangerous, but the VM can only see the "Hard Drive" of the VM. This is the beauty of VMs: the ability to separate the physical space of your computer across many VMs. While installing, be sure to take note of the password and username you chose, we will need these later.
The rest of the installation is pretty straightforward, but if you have any questions, you can find Ubuntu's official installation guide for Ubuntu here.
Step 3: Install and enable guest additions
Your regular operating system (Windows in this case) is called the Host, and all other operating systems that run as VMs are called Guests. To make working in your Guest OS easier, you need to install Guest Additions. It adds useful functionality to the Guest OS, such as full-screen guest mode.
While your VM is running, do the following steps:
Click the Whisker Menu
 on the top left of the desktop.
Type
Software Updaterin the text field that opens up and click on the item with the same name.Install all available updates. If there are no available updates, move on to Step 5.
If the Software Updater is stuck waiting for an unattended upgrade to finish, reboot the VM and start again from Step 1.
Open a terminal with
ctrl + alt + tor opening the Whisker Menu and typing in Terminal (the shortcut is obviously faster).Copy and paste this into the terminal:
sudo apt install linux-headers-$(uname -r) build-essential dkms. Enter your password when it asks you to. (note: Your password will not be visible in the terminal. This is a security feature to protect your password. PressEnterwhen done.)If you get the following errors: Unable to locate package build-essential and Unable to locate package dkms, paste in the following:
sudo apt-get install build-essentialand enter your password. Otherwise, move on to Step 8.Type
Ywhen it asks you to and let it finish installing. Close the terminal when it is finished.Click Devices on the VM toolbar -> Insert Guest additions CD image in the menu bar.
Wait for the CD image to mount, it will show the CD on the desktop as solid, not transparent, and a window will show on the top right of the VM screen saying it was successfully mounted.
If you see a File Manager window appear, then confirm the presence of a file named
VBoxLinuxAdditions.runbefore proceeding to step 12. But if you do not see a File Manager window appear, then navigate to the desktop by minimizing all opened windows, and then double-click on the CD icon on the VM desktop.In the new window that opens, right click on the white-space or any file/folder, and click Open Terminal Here.
In the newly opened terminal window, paste
sudo ./VBoxLinuxAdditions.runand hit enter.Once it finishes, close the terminal and the CD folder.
Right-click CD on the VM desktop and click Eject Volume. It will not eject if the CD folder is open.
Reboot your VM (which you can do by typing
rebootand hitting enter in a terminal).You can now maximize the VM window, create additional displays, and use many other useful features. These options are available on the VM toolbar under View and Device.
NOTE:
If upon trying to start the VM you only get a black screen, close and "power off" the VM, click "Settings -> Display" and make sure "Enable 3D Acceleration" is UNCHECKED, and Video memory is set to AT LEAST 128mb.
If you receive an error when trying to mount the Guest Additions CD image ("Unable to insert the virtual optical disk"), please reboot your host (Windows/OSX) operating system. Afterwards, ensure that there is no image file mounted in both Virtual Box as well as in the file system of the VM.
If you encounter the error "VirtualBox-Error: Failed to open a session for the virtual machine..." you might have to turn on 'virtualization' in your host's BIOS settings. If you are using Windows as your host OS you can follow these instructions, otherwise just google how to turn it on for your specific OS.
Are you using a touchscreen? Click here to watch a video on how to enable touchscreen controls for VirtualBox.
Step 4: Understand your new VM
Here are some tips to help you get started in a virtual environment:
All your work should happen in the VM. You will install everything you need for coding, including your text editor, Ruby, and Rails inside the VM. The Xubuntu installation inside of your VM also comes with a web browser pre-installed.
To install software on your VM, you will follow the Ubuntu installation instructions from inside the Xubuntu VM.
All of the development that you'll do related to this curriculum will be done in the VM.
We recommend going full screen (Edit > Full-screen Mode) and forgetting about your host OS (Windows). For best performance, close all programs inside of your host OS when running your VM.
If you added additional monitors in the "Display" tab of your VM settings, with the VM running, clicking "View" -> "Virtual Screen 2" -> "Enable". You can run fullscreen with multiple monitors, but it may ask for more "Video Memory", which you should have increased when adding more monitors. Upon exiting fullscreen, your secondary display may close. You can reopen it with these instructions.
Last updated